The post Savoury Turmeric & Zucchini Steel-Cut Oats. appeared first on Caroline Høgh Groth.
]]>It’s my favourite thing to do – transitioning into more grounding and heart-warming foods as the temperatures drop, in order for my body to feel more balanced and nourished with the seasons changing.
That said, if you’re an oatmeal lover, you can easily eat this recipe in full-fledged summer.. I’d even go as far as to say that you can actually eat this for lunch or dinner, seeing it’s savoury & it reminds me a little of a “healthified” risotto in some kind of way.
You guys went bonkers for it, when I posted it on my Instagram Stories the other day, so hopefully you’ll get into your kitchens and try to cook this one of the days coming. Maybe it’s perfect for Sunday? In any case, please do let me know, in the comments below or tag me on Instagram, if you do choose to create this little recipe.
If you’re not a masterchef, don’t fret – this recipe is super easy. All you need to make sure of, is that you stir the oats quite frequently so they don’t burn in the bottom of the pan, otherwise I think you should be all good.
This recipe creates enough oats for a small serving for 4 people – as it can be a little dense and we have toppings, you don’t want too big of a portion to weigh you down, especially if you have it for breakfast.
However, it’s easier for your gut to break down the oats, because we’ve soaked it overnight and rinsed them before cooking.
This recipe is gluten free, dairy free, sugar free and can be made vegan without the egg.
Ingredients:
- 2 cups of soaked-overnight & rinsed steel-cut oats (make sure they’re gluten free)
- 1 cup of water
- 1 cup of coconut-milk (or any milk you prefer)
- 1 grated zucchini
- 3/4 tsp ground turmeric
- 1/2 tsp garlic powder
- 50g vegan parmesan cheese (I used Alternative Dairy Co – but you can use real parmesan, too)
- Salt & pepper to taste (you need a bit more salt than usual for this)
- Hemp Oil (I used Hemple)
- 2 cups of fresh spinach
- 2 cloves of garlic, minced
- 1 avocado, quartered
- 4 eggs
- Hemp seeds
- Pepitas
Directions:
- Heat a medium pot on medium-high heat. Add the oats, water & coconut-milk. Wait for it to start to slightly boil.
- Add the grated zucchini, turmeric, garlic powder & salt/pepper and stir.
- By now, you would’ve been stirring for about 6-8 minutes.
- Add the vegan parmesan cheese & hemp oil and keep stirring. Taste with extra salt/pepper as needed.
- Turn it down to a low heat, and keep stirring. Getting it to the right texture – slightly moist, but not runny or dry. You want a medium firmness of the overall oats.
- Grab a pan and heat it to a high. Add a bit of olive oil and the minced garlic. Add the spinach to the pan and wilt it for a few seconds, turning the oil and garlic into it. Take off and put on a seperate plate.
- On the same pan, crack & add the 4 eggs and turn them into fried eggs.
- Arrange the oats in 4 bowls, divide the wilted spinach among the 4 bowls, add an egg to each bowl along with a quarter of avocado as well. Decorate with hemp seeds & pepitas and you’re ready to eat.
- You can even drizzle with a bit of hemp oil and add salt/pepper if it needs more.
FIND MORE OF MY RECIPES HERE

The post Savoury Turmeric & Zucchini Steel-Cut Oats. appeared first on Caroline Høgh Groth.
]]>The post Gut Loving Healthy Hot Chocolate appeared first on Caroline Høgh Groth.
]]>This is also GUT-LOVING if you want to invest in Medicinal Mushrooms and a few other additions like Collagen & Maca, because it helps your digestive system and the rebuild-up of your gut-lining, but by no means is it necessary to make the hot chocolate as it doesn’t add any flavour to it (besides from the Maca).
It’s super duper simple, and you can really do it with any type of milk, but I really like to make mine with Soy-Milk just because it froths up a lot when you give it a spin in the blender. I know there are loads of different opinions on Soy Milk, but it works for me to have a little of it each week. If you do suffer from excess oestrogen, I’d probably recommend to keep soy-milk at a minimum, but a little is okay.
See below for the recipe:
Healthy Hot Chocolate:
Serves 1
Ingredients:
- 1/2 cup of hot soy milk (or any other milk)
- 1/2 cup of boiled water
- 2 tsp unsweetened raw Cacao Powder
- 1 tsp of unsweetened Carob Powder
- 1 tsp Maca Powder
- Few drops of Vanilla Stevia
- Dash of Cinnamon
- 1 full dropper of Turkey Tail (medicinal Mushroom)
- 1 tsp Hydrolysed Collagen
- 1 tsp Almond Butter (or any nut butter of your choice)
- 1 tsp coconut flakes
Directions:
- Add all ingredients to a blender and whizz on high for 10 seconds
- Serve in a mug and sprinkle with coconut flakes & raw cacao
- FULLY ENJOY!

FIND MORE RECIPES HERE
The post Gut Loving Healthy Hot Chocolate appeared first on Caroline Høgh Groth.
]]>The post The Crispiest & Gut Friendly Brussels Sprouts You’ll Ever Taste – Ready in 15! appeared first on Caroline Høgh Groth.
]]>I’m here to change your perception and judgment of the humble brussels sprouts and if you’re already a brussels lover? Well, then I might even make you fall even harder and deeper in love with them with this recipe.
I’ve got to let you in on the secret to getting crispy brussels sprouts in a matter of minutes though – it’s all thanks to the new Ninja Foodi which is literally a comprehensive ‘kitchen-system’ that includes the multiple cooking functions like; grilling, steaming, baking, roasting, pressure cooking, air frying and slow cooking up to 70% faster than traditional methods, without losing the integrity of your favourite flavour-filled dishes.
And although Ninja did contact me to try this new compact kitchen machine out, initially I was sceptic, but I can genuinely say I’ve fallen head over heels with the ease, efficacy and taste that this machine brings to my meals. I’m especially looking forward to using it for winter to cook soups, casseroles and stews that are hearty and warm – especially gut-friendly ones, as cooked vegetables and cooked meats are a must if you’re dealing with a poor digestion (raw food is simply too hard on it) – to come home to after a long day out.
The smart thing about the Ninja Foodi is that it has several functions as described above. But, the other really clever things is that you can cook a whole meal in one go. This is a super smart thing for anyone who doesn’t have extensive time to spend in the kitchen or maybe just don’t want to? It truly does seal in the flavour and moisture like nothing else, and the salmon fillet I cooked with this recipe (below) is one of the most moist fillets I’ve ever tasted.
The one thing I’ve also come to discover is this; the manual is a little overwhelming in the beginning because there are so many different functions and uses to this machine (hence why it’s so comprehensive), but once you actually just start playing around with it, you’ll quickly realise it’s really darn hard to mess it up, even if you try to be really ‘fancy’ and make an inventive meal, it just somehow works. Even Pash can figure out how to operate it and cook when I’m not home to ‘put the bacon on the table’, and it takes only a few minutes to clean with soap & warm water.
I wanted to showcase a recipe that’s in season, because I believe it’s so important to eat what’s seasonally fresh and available to us – both for our bodies but also for the environment around us as it has far less impact on it that way.
In Australia, its’ Brussels Sprouts season currently and they’re super duper cheap – I’m talking a kilo for $5-$7. The same goes for broccoli and then simply adding a (skin off) fillet of salmon to the pot and you have yourself a healthy, gut-friendly and easy meal that can be prepared by anyone.

Ingredients:
- 1 piece of skin-off salmon fillet
- 150 grams of brussels sprouts (stems removed, halved)
- 4 florets of broccoli
- 1/4 avocado
- 1 tsp toasted sesame oil
- 1 tsp flaxseed oil
- 2 cups of water
- 1/2 lemon
- Hemp Seeds
- Pepitas
Directions:
- Pre-heat your Ninja Foodi on air-crisping mode for 2-3 minutes.
- Add the brussels sprouts to a bowl and lightly coat in a little toasted sesame oil & salt and pepper.
- Add them to the AIR FRYING basket, and set the Air Crisper Setting to 15 minutes.
- After 7 minutes, toss the brussels sprouts in the air frying basket, and create a little ‘hole’ in the middle.
- Add the salmon fillet (with salt & pepper) in between the brussels sprouts and keep air-crisping for another 7-8 minutes.
- Add 2 cups of water to the POT and add the AIR-FRYING basket.
- Add your broccoli & put on the steaming-lid. Keep the vent open.
- Hit steam & leave it for about 5 minutes so it’s lightly steamed, but still with a slight crunch to the bite.
- Arrange all on a plate, and add avocado, 1/2 lemon, hemp seeds & pepitas, drizzle with flaxseed oil.
With Mother’s Day Coming Up, This Is The PERFECT Gift.
Use The Discount Code
GROTHFOODI
to receive $60 off RRP + Free Delivery x
CLICK HERE
The post The Crispiest & Gut Friendly Brussels Sprouts You’ll Ever Taste – Ready in 15! appeared first on Caroline Høgh Groth.
]]>The post One Pan Vegetable Wonder appeared first on Caroline Høgh Groth.
]]>You really cannot go wrong with this dish. Even if you’re not a cook, it’s very hard to mess up. It’s also easy, convenient and quick – all the key-words you want, especially if you’re time-poor, a mumma or just don’t like cooking but still want to eat healthy?
This dish contains loads of delicious green vegetables and I’ll tell you why: Green Leafy Vegetables health benefits includes improving digestive health, maintaining weak eyesight, balancing cholesterol levels, enhancing youthful skin, treating anemia, fighting free radicals, supporting cardiovascular health, promoting weight loss, boosting energy levels, and increasing lifespan. Just to name a few..
One Pan Wonder – serves 2 people (DF, GF, SF, V)
Ingredients:
- 1/2 medium Zucchini, halved, sliced
- 1/4 head of Broccoli, cut into florets
- 1/8 head of Purple Cabbage, cut into slices
- 1/4 Leek, halved, sliced
- 2 Radishes, halved, sliced
- 2 pieces of Silverbeet, sliced
- 2 pieces of Kale, sliced
- 1/2 handful of Parsley
- 1/2 handful of Basil
- Salt & Pepper
- 1/2 tsp Turmeric
- 1/2 tsp Smoked Paprika
- 1/2 tsp Cumin
- 1/2 tsp Fennel Seeds
- 2 tbsp Bone Broth Concentrate + 1/4 cup boiling water
- 3 tbsp Pepitas
- 2 tbsp Hemp Seeds
- Coconut Oil
- 4 Free-Range Eggs
- 1/2 Avocado
Directions:
- Chop all your vegetables and have them ready.
- Heat a large frying pan on high with some coconut oil + have a lid that fits the sauce-pan ready.
- Add all the vegetables at once, and stir-fry.
- After 4 minutes, or when the vegetables have softened & slightly browned, add all your dried herbs and fresh herbs.
- Add your Bone Broth Concentrate (which you should’ve dissolved with boiling water) to the pain. Let it simmer for 2 minutes.
- Make 4 little wells in the vegetable mixture, and crack in your 4 eggs. Turn down the heat to a medium
- Add a lid, and let it simmer for about 2 minutes. The steam will cook the eggs quickly, so keep an eye on them.
- When the eggs are done (I prefer mine soft and runny), take the pan off the heat.
- Add 1/2 avocado in the middle, sprinkle with salt & pepper, pepitas and hemp seeds.


You can find more of my recipes here x
The post One Pan Vegetable Wonder appeared first on Caroline Høgh Groth.
]]>The post Adaptogen Superfood Protein Balls appeared first on Caroline Høgh Groth.
]]>Sometimes my recipes turn out great, other times.. not so much. But that’s a little bit like life, right? Better to have tried and failed than to never have tried at all..
Let’s get straight into it..
I whipped up these oh-so delicious and easy Adaptogenic Superfood Protein Balls in a jiff and I’m obsessed (currently on my 3rd ball writing this), so naturally I wanted you to join in on the yumminess.
What are adaptogens? Adaptogens are unique plants or herbs that support your adrenal system. They help balance your hormones, so you can manage your stress response on a day to day basis. Just like the word indicates, they adapt to what your body needs and have the ability to regulate your system up or down depending on the given need in the moment. Fancy, huh?
I’ve been a fan of adaptogens (ashwagandha, chaga, cordyceps, holy basil, maca, mucuna pruriens, reishi) for a long time, but it finally seems that the world has now caught onto their incredible benefits to our health and have started showing interest in what these incredible herbs can do for them when incorporated into a balanced and healthy diet.
Incorporating the adaptogens into a Protein Ball is smart because most of those herbs are far from pleasant in taste (besides from Maca), so you want to mix them with something that is slightly overpowering in taste.
Not to worry, I’ve thought about all of that for you. These balls will give you a good boost of protein and all the superfoods and adaptogens you need to get a morning or afternoon pick-me-up whilst still treating yourself to something yummy.
Makes 12 balls (vegan & gluten-free)
Ingredients:
- 1/2 cup coconut flour
- 1/2 cup pitted & soaked dates
- 3 tbsp black chia seeds
- 3 tbsp caco nibs
- 2 tbsp maca
- 1 tbsp ashwaganda
- 2 tbsp adaptogen plant protein
- 2 tbsp macadamia/cashew butter
- 1 tbsp coconut syrup
- 2 tbsp almond milk
Directions:
- Add all ingredients to a food processor and blend on high, scraping down the sides, until you get a mixed paste.
- Roll 12 balls in your hands from the paste and arrange on a plate.
- Store in the fridge in an airtight container for up to 4 days.

The post Adaptogen Superfood Protein Balls appeared first on Caroline Høgh Groth.
]]>The post Vegan Buddha Bowl appeared first on Caroline Høgh Groth.
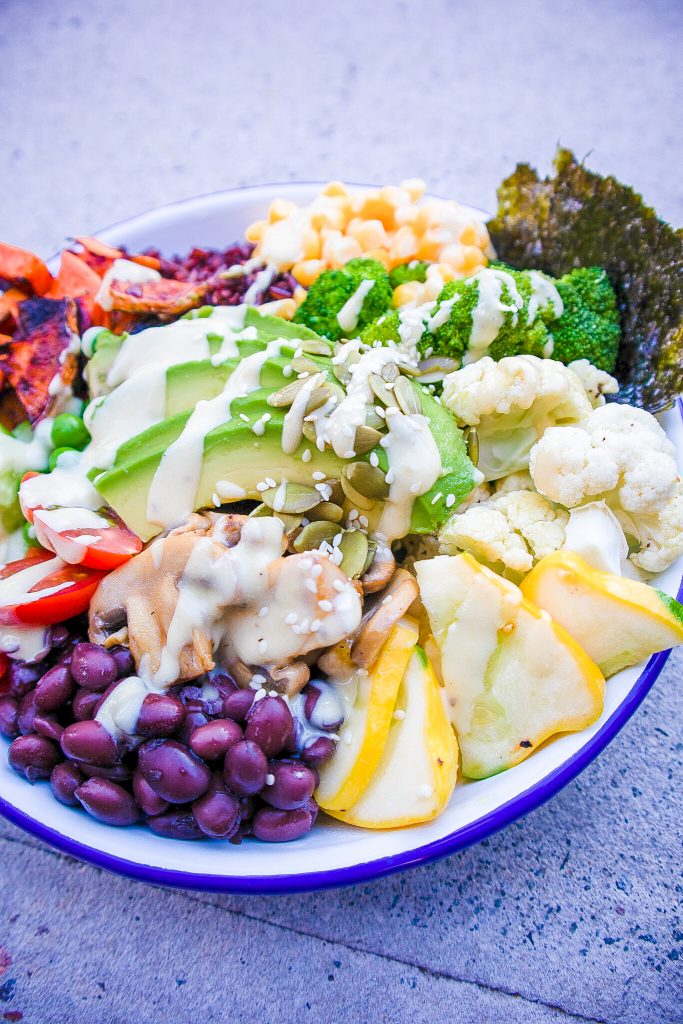
]]>I absolutely love a good buddha bowl. I think they’re super fun to create & eat, because I always feel like I get to eat the rainbow when I tuck into one and I always, always feel really good after one.
They’re so easy to adjust to the type of diet you eat, or if you have any intolerances you’re dealing with.
As you may have seen, I’ve been getting more into my vegan cooking and eating again, so expect to see many more plant-based recipes from me that will definitely also be gluten-free and always dairy-free because I’m not incorporating those into my diet any longer.
Without further a due, see below for a delicious Buddha Bowl Recipe that is vegan, gluten-free, refined grain-free, & sugar-free.
Ingredients (1 person):
- 2 tbsp fresh steamed corn
- 1/2 cup black rice
- 1/2 cup sweet potato
- 1/4 cup broccoli
- 1/4 cup cauliflower
- 1/4 cup yellow squash
- 2 tbsp black beans
- 2 tbsp cherry tomatoes
- 2 tbsp cucumber
- 1/2 avocado
- 1/4 cup mushrooms
- 1/2 nori sheet
- 1 tbsp unhulled tahini (I use Mayvers)
- 1/4 lemon
- salt & pepper
- 1 tbsp flaxseed oil (I use Melrose Health)
- 1 tbsp nutritional yeast
- water
- coconut aminos (I use Niulife)
Directions:
- Steam the corn, broccoli, cauliflower and yellow squash for a few minutes and set aside.
- Cut the cherry tomatoes in half, chop the cucumber, drain the black beans & rinse them well if using from a can, boil the black rice as per the package.
- Cut the mushrooms in 5mm slices and add to a hot pan with a bit of coconut oil. Season with salt & pepper and cook for 3 minutes or until brown. Add coconut aminos and cook for another 1 minute. Turn off heat and set aside.
- To make the Tahini dressing: mix Tahini, lemon, flaxseed oil, nutritional yeast and water in a bowl and whisk with a fork. If too thick, add more water. Taste with salt & pepper.
- Assemble everything in a bowl and drizzle with the Tahini Dressing.
ENJOY :)
And don’t forget to tag me in your creations, I’d love to see your Buddha Bowls.
Caroline xx
The post Vegan Buddha Bowl appeared first on Caroline Høgh Groth.
]]>The post VEGAN CREAMY COCONUT CARBONARA appeared first on Caroline Høgh Groth.
]]>Many equals vegan with being boring, flavourless not for them, but often those who have that opinion have never even tried a vegan meal or they’ve just been unfortunate enough to have a really poorly cooked one.
Happy to let you know that this dish is neither of those.. Well, I can’t be held accountable for your cooking-skills, but I dare say this is almost fool-proof and can be completed by even the most seasonal home-cook.
If you’re after a healthier alternative & to cut down on your animal-protein consumption, but still want to have a creamy & delicious pasta, well then this is absolutely for you.
Instead of using your standard eggs & cream you’d be using for a traditional Carbonara, I’ve incorporated coconut-cream & nutritional yeast which gives it the yellow colour along with it’s ‘cheesy-ness’. Instead of bacon, it contains baby peas, broccoli, green beans & mushrooms. It’s also made on a brown-rice pasta, which makes it gluten & wheat free.
Dietary Requirements: Vegan, Gluten-free, Wheat-free, Sugar-free.
SERVES 4
INGREDIENTS:
- 500g brown rice pasta
- 1,5 cups of steamed broccoli florets
- 1 cup of frozen peas, defrosted
- 10 mushrooms, cut into slices
- 1 cup of steamed green beans, cut into halves
- 2 cloves of garlic, finely chopped
- 1 can of organic coconut cream
- 0.25 cups of organic vegetable stock
- 3 tbsp nutritional yeast
- 4 tbsp coconut flour
- 1 tsp ground turmeric
- 1/2 tsp ground ginger
- Salt & pepper
- Pepitas
- Olive Oil
INSTRUCTIONS:
- Bring a large pot with water & salt to the boil on the stove.
- When boiling, add the rice-pasta and let it simmer for 8-10 minutes or until al-dente.
- Heat up a large sauce-pan and add 1 tsp of olive oil. Then add garlic, broccoli, green beans, mushrooms & stir.
- Add turmeric, ginger and a bit of salt & pepper.
- Add the coconut cream and nutritional yeast to the vegetable-mixture and stir.
- Add coconut flour by the tbsp and stir after each spoon. This is to thicken it up, so the sauce becomes creamier.
- If the sauce becomes too thick add more vegetable-stock.
- Add the drained pasta to the pot along with the peas and mix it all together. Add more salt & pepper to taste.
- Arrange on plates or in bowls and decorate with pepitas and more nutritional yeast flakes.

If you do end up cooking this, I’d love to see your creations.
Please tag me on Instagram; @carolinehgroth so I can share your wonderful cooking.
Lots of love, Caroline xx
The post VEGAN CREAMY COCONUT CARBONARA appeared first on Caroline Høgh Groth.
]]>The post BEEF BONE BROTH appeared first on Caroline Høgh Groth.
]]>As you may have seen on my Instagram I have recently embarked on a journey to properly heal my gut once and for all.
I have, and still am, very exhausted and fatigued most of the day, my skin is breaking out – both with acne but also with chicken-skin across my body, I’m bloated, constipated and just a bit of a shell of a human, to be honest. At my lowest, and when I had a little mental breakdown on Saturday, I decided that enough is enough..
Unfortunately, as I don’t receive Medicare, I’m not at the liberty of finding specialists and run tests that can help pin-point what exactly is wrong with me, so I’ve had to do what I’ve always done; research and read my way to (potentially) figuring out what’s going on with me.. I know that, on the back of cancer and eating disorders, I’ve had severe Gut-Health issues, so my thoughts are that my gut simply isn’t working, or that I am, in fact, suffering from Leaky Gut..
I’ll write further about Leaky Gut once I’m more into my new diet to see if it helps me. So far, it’s been very helpful the past 3 days, although I did have something last night that made my tummy flare up, and I looked 5 months pregnant.
One of the things that is recommended on a Leaky Gut Diet is to drink Bone Broth twice a day (2 x 250ml) to heal your gut. Broth contains collagen and the amino acids proline and glycine that can help heal your damaged cell walls.

See below for my Beef Bone Broth Recipe:
Ingredients:
- 2 kg of Beef Bones (from grass-fed cows – very important!)
- Water
- 4 tbsp Apple Cider Vinegar
- 2 Carrots
- 2 Celery Stalks
- 1 Large Onion (with skin)
- 4 Bay Leaves
- 4 Cloves of Garlic
- 15 stalks of Fresh Thyme
- 10-15 Peppercorn
- 2-3 tbsp Salt (more to taste once done)
- 4 Curry Leaves
Instructions:
-
Heat the oven to 240 degrees, and place all the bones in a baking-tray. Roast for 30 minutes to improve flavour.
-
When the bones have roasted, place the bones in a large stock pot (with juices)
-
Add cold water to the pot so it covers the bones and a bit more. Add the vinegar over the bones. Leave it for about 30 minutes so the Vinegar can help draw out the nutrients of the bones.
-
Roughly chop and add the onion, carrots, and celery to the pot. Leave the skin on the vegetables, just make sure you rinse it well.
-
Add the rest of the herbs, spices, pepper & salt to the pot.
-
Bring the broth to a boil, then reduce to a simmer and simmer until done. The longer you leave it to simmer, the more nutrients. However, I leave mine to for about 4 hours. You can leave it to simmer for up to 10 hours if you wish.
- Check on it every hour, and add more water if needed.
-
When finished, remove from the heat and let it cool slightly. Remove the bones with tongs, and strain the broth using a fine strainer to remove all the bits of excess fat & vegetable, so you get a clear broth.
-
You can store the broth in glass jars in the fridge for 4-5 days or freeze it for later.
Hope you love it. Please let me know how you go.
Caroline xx
The post BEEF BONE BROTH appeared first on Caroline Høgh Groth.
]]>The post IMMUNITY BOOSTER HEALTH TONIC appeared first on Caroline Høgh Groth.
]]>You might’ve seen this yellow immunity health-tonic across my Instagram over Winter & Spring.. and for very good reasons.
It’s been helping me keep my immune-defence strong and agile, and have cut down the length & severity of my cold-symptoms when they have come on.
It’s incredibly easy to make, and won’t cost you much. A little also goes a long way, and you just need a little bit of the tonic every morning on an empty stomach. Twice a day if you feel a virus coming on or are battling the flu.
So what’s in it? Well, just a few simple ingredients, but they really pack a punch and your insides will love you for it.
See below for the recipe:
Makes app. 800 ml:
Ingredients:
- Fresh ginger, sliced (size of 1/2 your palm)
- Fresh turmeric, slices (size of 1/2 your palm)
- 2 tbsps organic honey or 1 tbsp Manuka Honey
- 50 ml unfiltered apple-cider vinegar
- 1 litre of filtered water
- Juice of 2 lemons
- Freshly ground pepper
Directions:
- Add the filtered water, ginger, turmeric, juice of lemons, ground pepper and organic honey to a small pot and place it on the stove on high heat. Cover with a lid and wait until it boils. Turn it off and leave (with the lid) until cool.
- When cool, turn on the stove again on high heat with the lid and bring it to a boil. Turn it off and leave to stand over night.
- The next day; add the unfiltered apple-cider vinegar (and more honey if you want it sweeter), and use a strainer to pour into some airtight jars and place in the fridge.
- Keep in the fridge and have 1/2 glass every morning to start the day with.
![]()
Let me know if you end up trying this, and what you think of it.
Caroline xx
The post IMMUNITY BOOSTER HEALTH TONIC appeared first on Caroline Høgh Groth.
]]>The post RAW CHOCOLATE PEANUT BUTTER BALLS appeared first on Caroline Høgh Groth.
]]>You were all hounding me for this recipe after popping up the photos on my Instagram Stories last night, so here it is for you all.
I love, love, love healthy and easy snacks that are quick to make at home, and best of all; doesn’t cost you a fortune either!
Yesterday I was really in the mood for something sweet – and this was even after having had sticky-rice ice cream (oops!), so I whipped up these healthy Raw Chocolate Peanut Butter Balls for Pash and myself, and it only took me 15 minutes – no joke!
We had one each, and popped the rest in the fridge – plenty for the next few weeks ahead.
These are completely vegan, diary-free, gluten-free & refined sugar-free.
The below recipe will give you about 24 balls or so – depending on how big or small you roll them.
Raw Chocolate Peanut Butter Balls:
Ingredients:
- 1 cup pitted dates
- 1/2 cup sunflower seeds (can substitute with any seeds or nuts)
- 2 tbsp peanut butter (can substitute with any nut butter or leave it out completely)
- 6 tbsp raw cacao
- 3 tbsp desiccated coconut + more for rolling.
- 1/2 cup rolled oats
- 2 tbsp coconut oil
- water
Directions:
- Add all ingredients to a food processor or blender and blend until almost smooth. I like it a bit chunky, but you can blend for as long as you want to.
- Add more water if it’s not blending properly, but not too much as you don’t want to mixture too soggy.
- Roll the mixture into little balls and roll them in desiccated coconut afterward.
- Store in an airtight container in the fridge.
Let me know in the comments what you think, if you do decide to make them at home.
They’re super easy, and even the fussiest eaters will love these – promise!

The post RAW CHOCOLATE PEANUT BUTTER BALLS appeared first on Caroline Høgh Groth.
]]>